Free Trial
Try before you buy with our
Free Trial of Practice-Web!

Try before you buy with our
Free Trial of Practice-Web!
Choosing a practice management solution is one of the most important decisions you’ll make, whether you’re just starting out, going paperless, or switching from another software. So it’s generally a good idea to try before you buy. After taking a one-on-one online demo with one of our specialists to understand Practice-Web, download our free trial version below!
Get a Free Demo
The first step to really understand Practice-Web is to get a free one-on-one online demo with one of our specialists. That way you will know what you are looking at and how to use Practice-Web. Click on the demo button above to sign up!
The next step is to download the free trial version of Practice-Web. Our specialist will install the free trial after the demo so you can get started. Or, if you prefer, you can install the demo yourself.
Download Free TrialFor installation, please follow the instructions in the next section below.

We may remote into your computer to help you with Practice-Web. Please select the applicable remote access link below when directed to do so by our Support Team.
1. You may install the Free Trial on a workstation or a server. There is an entry limit of 30 patients. If you want to install the trial version on a server and connect other workstations to it, contact our Support Team at 800.845.9379, option 2.
2. After downloading the Free Trial file, right-click on the downloaded file and select "Run as administrator."
3. If you get a security pop-up, click on "More info" at the top and then click on the "Run anyway" button at the bottom.
4. Click "Yes" to launch the installer. The file will automatically extract itself. Wait for a few seconds for the Practice-Web Installer window to open.
5. In the Installer window, make sure "New Server" radio button is selected at the top and that all checkboxes are marked. (The Freedental Database path C:\mysql\data\ must be a local path.)
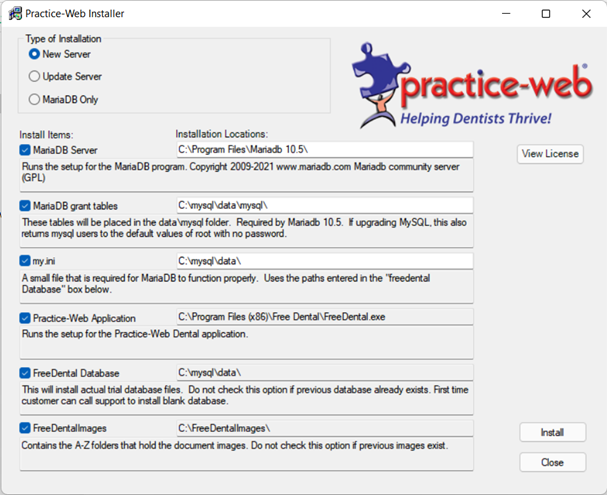
6. At the lower-right section of the screen, click on "Install."
7. The Installer will install Maria DB version 10.5.
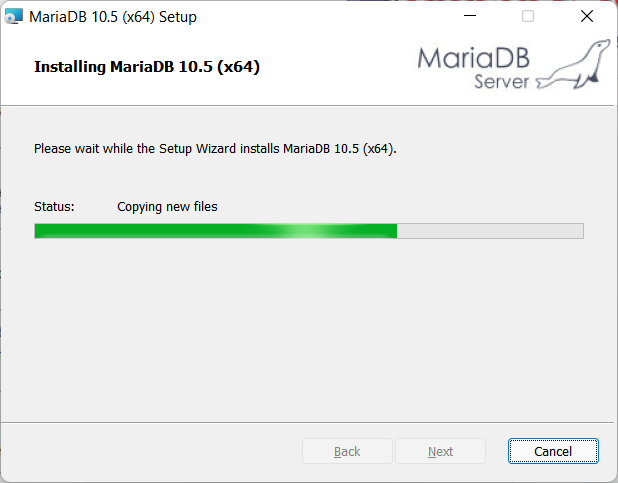
10. After the MariaDB installation is finished, follow prompts to complete the Practice-Web Trial version install.
11. When all done, close the installer and then right-click on the Practice-Web Icon on your Windows desktop and "Run as Administrator." When you get the prompt, click "Override," then "OK," and re-open the Practice-Web application. You are ready to go--happy testing!
12. To enhance the 3-D Tooth Chart, go to File Menu-> Graphics, then check the "Use OpenGL Tooth Chart" option, check "Hardware Acceleration" to turn that on, and select the highest available graphic format in the grid, then click "OK" to close.
Practice-Web is committed to helping your dental office thrive! Our specialists are ready to show you how our practice management and smart tools can improve your revenue and productivity.